Category Archives: homelab

[OUTDATED] Homelab: Modlin

Hardware Setup for a High-Performance Home Server

Hardware Components

  • Processors: 2x Intel Xeon E5-2650 v2
  • Coolers: 2x Deepcool Gammaxx 400
  • Storage Controller: Dell H310i / LSI SAS9211-8i
  • Hard Drives:
    • 3x WD WhiteLabel 12 TB
    • 3x WD WhiteLabel 18 TB
    • 1x WD WhiteLabel 16 TB
  • SSDs:
    • 2x KIOXIA-EXCERIA SSD 500 GB
    • 1x Crucial MX500 2 TB
    • 2x Crucial MX500 500 GB
  • Chassis: Fractal Design 7 XL

Software Configuration

Proxmox VE Virtualization Environment

  • TrueNAS Scale (with HBA passthrough for Dell H310i)
  • Mail-in-a-Box (mailinabox.email)
  • Docker VM for containerized applications
  • MariaDB for SQL database hosting

TrueNAS Configuration

The TrueNAS virtual machine is set up with:

  • Passthrough Devices: Dell H310i HBA card and two NVMe drives.
  • Storage Pool Configuration:
    Each pool has dedicated VDEVs for metadata (mirrored) and cache (striped) using NVMe drives.

Storage Pools Overview:

Pool Drives Content Notes
hoardings 3x 18TB Media STRIPE
nvr 1x 16TB NVR -
storage 3x 12TB Backups RAIDz1

Application Stack

This server hosts a comprehensive range of applications, including:

bazarr
ESPHome
ferdium-server
freshrss
gitea
grafana
hass
immich
influx
jenkins
lidarr
meshcentral
mongodb
mqtt
netbootxyz
overseerr
paperless-ngx
photoprism
pihole
piholeinflux
piper
prometheus
prowlarr
radarr
readarr
sonarr
syncthing
tautulli
traccar
unifi-db
unifi-network-application
unifi-poller
unpackerr
uptime-kuma
varken
whisper
wordpress
zigbee2mqtt
zigbee2mqttAssistant

Notes and Insights

  1. NVMe Boot Compatibility

    • The motherboard does not support booting from NVMe drives.
  2. Cooling Challenges on LGA2011 Narrow ILM

    • Narrow ILM-compatible coolers are rare. Adapter brackets for AM4 mounting were used, specifically lever-based designs to ensure compatibility. Example bracket:
      LGA2011 to AM4 Adapter
    • These adapters reduce clearance near one of the RAM banks:
      Reduced Clearance
    • Deepcool Gammaxx 400 coolers were selected for their lever-based mounting mechanism.
  3. Fan Selection

    • Arctic P12 PWM and P14 PWM fans were chosen for their performance, offering Noctua-level efficiency at a fraction of the cost.
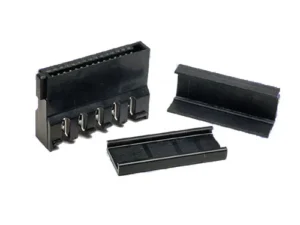
  4. SATA Power Safety

Conclusion

This setup demonstrates how to configure a robust home server with Proxmox VE. From advanced cooling solutions to optimized storage and comprehensive application hosting, this server is tailored for high-performance workloads.


Keywords

  • Proxmox Home Server
  • TrueNAS Storage Configuration
  • High-Performance Server Build
  • LGA2011 Cooling Solutions

Tags

  • Proxmox
  • TrueNAS
  • Home Server
  • Linux Administration
  • Hardware Optimization

[NIEAKTUALNE] Homelab: modlin

Sprzęt:

2x Intel Xeon E5-2650 v2
2x Deepcool Gammaxx 400
1x Dell H310i / LSI SAS9211-8i
3x WD WhiteLabel 12 TB
3x WD WhiteLabel 18 TB
1x WD WhiteLabel 16 TB
2x KIOXIA-EXCERIA SSD 500 GB
1x Crucial MX500 2TB
2x Crucial MX500 500GB
Fractal Design 7 XL chassis

Soft:

Proxmox:

* TrueNAS Scale (HBA - Dell H310i - passthrough)

* mail-in-a-box

* Docker VM

* MariaDB SQL Database

TrueNAS

Do VM z TrueNAS zrobiony jest passthrough karty HBA - Dell H310i oraz 2 dysków NVMe

wszystkie poole mają swoje specjalne vdev na metadane (mirror), i cache (stripe) na NVMe

Pool Dyski zawartość uwagi
hoardings 3x18TB media STRIPE
nvr 1x16TB NVR  
storage 3x12TB kopie zapasowe RAIDz1

Apps:

bazarr
ESPHome
ferdium-server
freshrss
gitea
grafana
hass
immich
influx
jenkins
lidarr
meshcentral
mongodb
mqtt
netbootxyz
overseerr
paperless-ngx
photoprism
pihole
piholeinflux
piper
prometheus
prowlarr
radarr
readarr
sonarr
syncthing
tautulli
traccar
unifi-db
unifi-network-application
unifi-poller
unpackerr
uptime-kuma
varken
whisper
wordpress
zigbee2mqtt
zigbee2mqttAssistant

Uwagi

1. płyta główna nie obsługuje bootowania z dysków NVMe

2. chłodzenie na LGA2011 narrow ILM niemalże nieistnieją. Na ratunek przychodzą adaptery LGA2011 narrow ILM -> AM4 na dźwignię. Wyglądają tak:

I znacząco zmniejszają dostępną przestrzeń przy jednym z banków DDR:

Istotne jest też to, żeby chłodzenie AM4 obsługiwało montaż na dźwignię, a nie na 4 śruby. Stąd wybrałem Deepcool Gammaxx 400

3. wentylatory wybrałem Arctic P12 PWM oraz Arctic P14 PWM. Wydajność Noctua za mniej niż połowę ceny

4. wtyczki SATA. Typowe adaptery / rozgałęziacze stanowią zagrożenie pożarowe

https://www.crucial.com/support/articles-faq-ssd/dangerous-molex-to-sata-cables

https://www.risersqc.ca/blogs/blog/is-it-really-dangerous-to-supply-your-risers-with-sata

https://www.reddit.com/r/NiceHash/comments/pyjmmw/using_sata_to_power_risers_are_so_dangerous_that/

Żeby się przed tym ustrzec kupiłem i założyłem takie:

wyglądają i działają znacznie lepiej. Nie ma też kilometrów kabli pomiędzy dyskami

Installing OPNsense on an OVH VPS

Installing OPNsense on an OVH VPS

This guide walks you through installing OPNsense on an OVH VPS using a Nano image. It works for me, it might not work for you.

Prerequisites

  1. An OVH VPS with access to recovery mode.
  2. Sufficient permissions to modify /dev/sda.

Steps

Step 0: Reboot the VPS into Recovery Mode

Start by rebooting the VPS into recovery mode from the OVH control panel. This allows full access to the disk for the installation process.

Step 1: Create a Temporary Mount

Once in recovery mode, mount a temporary filesystem (tmpfs) to use as a working directory:

mount -t tmpfs -o mode=1777 tmpfs /mnt

Step 2: Download the OPNsense Nano Image

Next, download the latest OPNsense Nano image from an official mirror. This example uses LeaseWeb's mirror, but you can select one closer to your region from the OPNsense Download Page:

wget https://mirror.ams1.nl.leaseweb.net/opnsense/releases/.../your-image.img.bz2 -P /mnt

Step 3: Extract the Image

Decompress the image using bunzip2:

bunzip2 /mnt/OPNsense-23.7-nano-amd64.img.bz2

Step 4: Write the Image to Disk

Using dd, write the image directly to /dev/sda. This will overwrite any existing data, so double-check the target disk.

dd if=/mnt/OPNsense-23.7-nano-amd64.img of=/dev/sda bs=1M status=progress

Step 5: Reboot the VPS

Finally, reboot the VPS from the OVH control panel to exit recovery mode and boot into OPNsense.


This setup should get OPNsense up and running on your OVH VPS, ready for configuration. Remember to go to KVM console and assign interfaces properly. Also you might need to enable accsessing WebUI on WAN port.

Media ingestion snippets

Automating Media File Management with Linux and Command-Line Tools

Introduction

Efficiently organizing and processing media files can save significant time and effort. This blog post outlines highly technical solutions for renaming, sorting, and processing media files using Linux command-line tools. Each command is explained in detail, highlighting its purpose, caveats, and possible improvements. SEO-optimized for media management enthusiasts.


Renaming GoPro Clips Based on Creation Dates

for f in *.MP4; do mv -n $f $(date -r $f +%Y%m%d_%H%M%S).mp4; done

Explanation:

  • for f in *.MP4: Loops through all MP4 files in the current directory.
  • mv -n $f $(date -r $f +%Y%m%d_%H%M%S).mp4: Renames each file to its creation date (format: YYYYMMDD_HHMMSS)
    • -r $f: Extracts the modification time of the file.
    • +%Y%m%d_%H%M%S: Formats the timestamp.
    • -n: Prevents overwriting existing files.

Caveats:

  • Relies on file modification times, which might differ from actual creation times. If precise creation dates are required, use EXIF metadata instead. Cameras easily loose track of time due to lack of a RTC

Improvement:

  • Use exiftool for more reliable metadata extraction:

    for f in *.MP4; do mv -n "$f" $(exiftool -d '%Y%m%d_%H%M%S.mp4' -CreateDate "$f"); done
    • use find & xargsinstead of a for loop

Renaming Pictures Using EXIF Data

find . -type f ! -name '*.tmp' -print0 | xargs -0 -P 12 -n 100 exiftool -r '-FileName<\$CreateDate' -d '%Y-%m-%d %H.%M.%S%%-c.%%le'

Explanation:

  • find . -type f ! -name '*.tmp': Finds all non-temporary files recursively.
  • -print0 | xargs -0: Handles filenames with special characters.
  • -P 12: Runs 12 parallel processes for efficiency.
  • -n 100: Processes up to 100 files per command.
  • exiftool -r '-FileName<\$CreateDate': Renames files based on their EXIF CreateDate metadata.
  • -d '%Y-%m-%d %H.%M.%S%%-c.%%le': Formats the filename to include date, time, and counter for duplicates.

Caveats:

  • EXIF metadata must exist; otherwise, files won’t be renamed.

Improvement:

  • Add error handling for files without EXIF metadata:
    find . -type f ! -name '*.tmp' -print0 | xargs -0 -P 12 -n 100 exiftool -r '-FileName<\$CreateDate' -d '%Y-%m-%d %H.%M.%S%%-c.%%le' || echo "Some files lack EXIF data."

Creating a Timelapse Video from JPEG Snapshots

ffmpeg -r 12 -pattern_type glob -y -i '*.jpg' -vcodec mjpeg_qsv -crf 0 output.mp4

Explanation:

  • -r 12: Sets the frame rate to 12 frames per second.
  • -pattern_type glob -i '*.jpg': Matches all JPEG files.
  • -vcodec mjpeg_qsv: Uses Intel Quick Sync for MJPEG encoding.
  • -crf 0: Ensures lossless compression.

Caveats:

  • Requires Intel hardware with Quick Sync support.

Improvement:

  • Add resolution adjustment for consistency:
    ffmpeg -r 12 -pattern_type glob -y -i '*.jpg' -vf scale=1920:1080 -vcodec mjpeg_qsv -crf 0 output.mp4

Timelapse from Video with Motion Blur

ffmpeg -i input.mkv -filter:v tblend=average,framestep=2,setpts=0.1*PTS -r 96 -b:v 30M -crf 10 -vcodec h264_qsv -an -y output.mkv

Explanation:

  • tblend=average: Applies motion blur by blending frames.
  • framestep=2: Skips every other frame.
  • setpts=0.1*PTS: Speeds up playback to 10% of the original duration.
  • -r 96: Sets the output frame rate to 96 FPS.
  • -b:v 30M: Sets a high bitrate for quality.
  • -crf 10: Balances quality and compression.
  • -vcodec h264_qsv: Uses Intel Quick Sync for H.264 encoding.

Caveats:

  • Requires substantial processing power.

Improvement:

  • Automate bitrate calculation based on input resolution:
    ffmpeg -i input.mkv -filter:v tblend=average,framestep=2,setpts=0.1*PTS -r 96 -b:v $(expr $(ffprobe -v error -select_streams v:0 -show_entries stream=height -of csv=p=0 input.mkv) \* 100)k -crf 10 -vcodec h264_qsv -an -y output.mkv

Merging Videos Without Transcoding

ffmpeg -safe 0 -f concat -i <(find . -type f -name '*MP4' -printf file '$PWD/%p'\n | sort) -c copy output.mkv

Explanation:

  • find . -type f -name '*MP4': Finds all MP4 files.
  • -printf file '$PWD/%p'\n: Formats paths for FFmpeg.
  • -safe 0: Allows unsafe file paths.
  • -f concat -i: Concatenates video files.
  • -c copy: Merges files without re-encoding.

Caveats:

  • Files must have identical codecs, resolution, and framerate.

Improvement:

  • Validate file compatibility before merging:
    find . -type f -name '*MP4' | xargs -I {} ffprobe -v error -show_entries stream=codec_name,height,width -of csv=p=0 {} | sort | uniq -c

Sorting Pictures by Camera Model

exiftool -d '.' '-directory<${model;}/$datetimeoriginal' *.jpg

Explanation:

  • -d '.': Uses a dot separator for directories.
  • '-directory<${model;}/$datetimeoriginal': Organizes pictures into folders by camera model and original date.

Caveats:

  • Assumes consistent EXIF metadata.

Improvement:

  • Add fallback for files missing camera model metadata:
    exiftool -d '.' '-directory<${model;}/$datetimeoriginal' -if '$model' *.jpg || mv *.jpg Unknown_Model/

Sorting Pictures by Year and Month

find . -type f ! -name '*.tmp' -print0 | xargs -0 -P 12 -n 100 exiftool -d '%Y/%m' '-directory<\$CreateDate'

Explanation:

  • Organizes files into directories structured as Year/Month.
  • Multi-threaded for faster processing (-P 12).

Caveats:

  • Requires valid EXIF CreateDate metadata.

Improvement:

  • Create missing directories dynamically to prevent errors:
    find . -type f ! -name '*.tmp' -print0 | xargs -0 -P 12 -n 100 exiftool -d '%Y/%m' '-directory<\$CreateDate' || mkdir -p Unknown_Date/

Injecting Dates into WhatsApp Media Files

exiftool -if 'not $CreateDate' -if '$filename =~ /^(?>VID|IMG)-\d{8}-WA\d{4,}\./' -r -overwrite_original_in_place -progress '-AllDates<${filename;s/WA.*//} 12:00:00' .

Explanation:

  • -if 'not $CreateDate': Ensures only files without a CreateDate are processed.
  • -if '$filename =~ /^(?>VID|IMG)-\d{8}-WA\d{4,}\./': Targets WhatsApp media files named in the format VID-YYYYMMDD-WAXXXX or IMG-YYYYMMDD-WAXXXX.
  • -r: Recursively processes all files in the specified folder.
  • -overwrite_original_in_place: Updates files directly without creating backup copies.
  • -progress: Displays progress for better monitoring.
  • '-AllDates<${filename;s/WA.*//} 12:00:00': Extracts the date from the filename and sets it as the AllDates metadata, appending a fixed time (12:00:00) for consistency.

Background and Use Case:

WhatsApp-received media often lacks proper EXIF metadata for the creation date, which can lead to incorrect grouping when imported into platforms like Immich. This command extracts the date embedded in the filename (representing the download date) and injects it into the file's metadata, ensuring accurate sorting on a timeline.

Caveats:

  • Always back up your files before modifying metadata to prevent accidental loss or corruption.
  • Ensure exiftool is installed and updated on your system.
  • Stop Immich containers before running the script to avoid file conflicts. Restart the containers afterward and rerun the \"Extract Metadata\" job for proper sorting.
Conclusion

These commands provide powerful tools for managing media files efficiently. With optimizations and error handling, they can handle large datasets with reliability and speed.

Keywords

  • Media File Management
  • Linux Media Automation
  • ffmpeg Timelapse
  • exiftool Picture Organization

Tags

  • Linux
  • ffmpeg
  • exiftool
  • Media Management

Homelab: Dewey

Specs:
- CPU: Intel Core i7-7700k
- Motherboard: Z270 GAMING M3 (MS-7A62)
- GPU: ASUS GeForce GTX960
- RAM: Kingston HyperX 3x8GB DDR4 2.4GHz
- Storage: 2x Corsair MP500 m.2 240G SSDs in mdadm RAID0, 1x WD Black 1TB for storage. 100GB LVM volume as writeback cache for HDD
- Fans: NOCTUA

Roles:
- Docker host
- gaming in virtual machine
- general workstation

Runs:
- ArchLinux